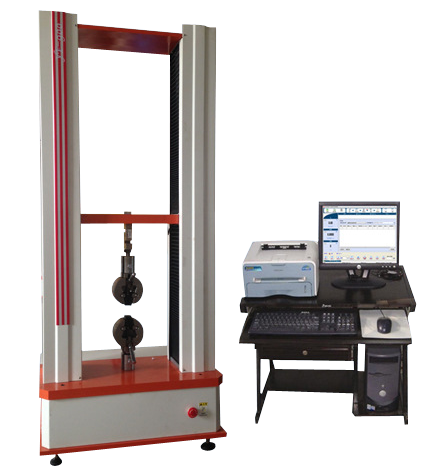
GB/T 1040塑料拉伸性能试验机
试验机仪表:
本仪表采用国际比较先进的放大器,A/D、微处理器、高性能高清晰的液晶显示屏构成,整个系统采用类似手机PDA键盘,光标导航,全中文显示,浮点数数据处理,结构简单操作方便,自动计算存储,适合于企业,质检单位材料力学性能检测仪表。
GB/T 1040塑料拉伸性能试验机
工作环境条件
1 在室温100C~350C范围内,相对湿度不大于80%;
2 在稳固的基础或工作台上正确安装,水平度为0.2/1000;
3 在无震动、无腐蚀性介质和无较强电磁场干扰的环境中;
4 电源电压的波动范围不应超出额定电压的?10%。
技术参数:
α、最大试验力:0—300KN
β、试验力分档:全程不分档,全程分辨率不变
γ、试验力显示范围:0~300KN
δ、试验力有效测量范围:满量程的2%~100%
ε、试验力测量精度:优于示值的?1%
ζ、位移分辨率:0.01mm
θ、位移速度控制精度:优于?0.5%
ι、位移测量准确度:优于?0.5%
κ、拉伸行程:0~1000mm(不含附具)
λ、供电电源:220V,50Hz
η、位移速度控制范围:0.05mm/min~500mm/min,无级调速,速度任意设定
拉伸试验
一是根据试样选用量程,挂好铊并对准刻线,并调整缓冲阀使之与量程范围相适应。二是打开电源,启动油泵,开启送油阀让活塞上升下降200mm,2次~3次。三是让活塞上升20mm~40mm,调指针对准零位。四是调整移动横梁至适当位置。关闭送油阀,按动夹头“开”、“夹紧”按钮,夹紧试样,必须注意使试样处于铅垂并位于中间位置。按试验要求的加荷速度调整指示盘转速。五是打开送油阀开始加荷,使指针的旋转速度与跟踪盘的速度基本保持一致。六是试样破坏后,关闭送油阀,记录试验数据,将被动针拨回零位,取下断裂的试样。七是重复二到六的内容继续下一试验。
功能特点:
采用国外先进技术,全数字放大、采集,显示稳定、精度高、使用方便。采用铝合金外罩,主机采用直流或交流伺服电机、精密减速机、高精度丝杠、具有传动平稳、噪音低、速度精度高、调速范围宽,使用寿命长等特点;液晶实时显示,可显示试验力、峰值、位移、速度、试验状态等,外观大方,使用方便,操作简单;具有限位、过载自动保护、试样断裂自动停机等功能。配置标准拉伸附具一套。

适用范围:
广泛应用于电线电缆、纺织物、防水材料、无纺布、安全带、橡胶、塑料、薄膜、钢丝绳、钢筋、金属丝、金属箔、金属板材和金属棒丝等金属材料和非金属材料及零部件产品进行拉伸、压缩、弯曲、撕裂、90?剥离、180?剥离、剪切、粘合力、拔出力、延伸伸长率等试验,以及一些产品的特殊力学性能试验。
(一)普通测试项目:(普通显示值及计算值)
●拉伸应力 ●拉伸强度 ●扯断强度 ●扯断伸长率
●定伸应力 ●定应力伸长率 ●定应力力值 ●撕裂强度
●任意点力值 ●任意点伸长率 ●抽出力 ●粘合力及取峰值计算值
●压力试验 ●剪切剥离力试验 ●弯曲试验 ●拔出力穿刺力试验
(二)特殊测试项目:
1.弹性系数即弹性杨氏模量定义:同相位的法向应力分量与法向应变之比。为测定材料刚性之系数,其值越高,材料越强韧。
2.比例限:荷重在一定范围内与伸长可以维持成正比之关系,其最大应力即为比极限。
3.弹性限:为材料所能承受而不呈永久变形之最大应力。
4.弹性变形:除去荷重后,材料的变形完全消失。
5.永久变形:除去荷重后,材料仍残留变形。
6.屈服点:材料拉伸时,变形增快而应力不变,此点即为屈服点。屈服点分为上下屈服点,一般以上屈服点作为屈服点。屈服(yield):荷重超过比例限与伸长不再成正比,荷重会突降,然后在一段时间内,上下起伏,伸长发生较大变化,这种现象叫作屈服。
7.屈服强度:拉伸时,永久伸长率达到某一规定值之荷重,除以平行部原断面积,所得之商。
8.弹簧K值:与变形同相位的作用力分量与形变之比。
9.有效弹性和滞后损失:在复合材料拉力试验机上,以一定的速度将试样拉伸到一定的伸长率或拉伸到规定的负荷时,测定试样收缩时恢复的功和伸张时消耗的功之比的百分数,即为有效弹性;测定试样伸长、收缩时所损失的能与伸长时所消耗的功之比的百分数,即为滞后损失。

配置清单:
名称 | 数量 | 勾选 |
主机 | 一台(单臂式结构 双柱式结构)可选 |
|
高精度光电编码器 | 一只 |
|
全数字调速系统和全数字调速电机 | 一套 |
|
高精密滚珠丝杠副 | 一套 |
|
精密圆弧同步减速系统 | 一套 |
|
高精度负荷传感器 | 一支 |
|
夹具 | 一套 |
|
联想计算机 | 一台 | 选配 |
喷墨打印机 | 一台 | 选配 |
GB/T 1040 Plastic Tensile Testing Machine
Testing machine instruments:
This instrument adopts internationally advanced amplifiers, A/D、The system is composed of a microprocessor and a high-performance, high-definition LCD display screen. It adopts a keyboard similar to a mobile phone PDA, cursor navigation, full Chinese display, floating-point data processing, simple structure and easy operation, automatic calculation and storage. It is suitable for material mechanical performance testing instruments in enterprises and quality inspection units.
Working environment conditions
Within the temperature range of 100C-350C, the relative humidity should not exceed 80%;
2. Install correctly on a stable foundation or workbench, with a levelness of 0.2/1000;
In an environment without vibration, corrosive media, and strong electromagnetic field interference;
The fluctuation range of the power supply voltage should not exceed ? 10% of the rated voltage.
Technical parameters:
α、Maximum test force: 0-300KN
β、Test force grading: no grading throughout the entire process, with unchanged resolution throughout the entire process
γ、Test force display range: 0-300KN
δ、Effective measurement range of experimental force: 2% to 100% of full scale
ε、Test force measurement accuracy: better than ? 1% of the indicated value
ζ、Displacement resolution: 0.01mm
θ、Displacement velocity control accuracy: better than ? 0.5%
ι、Displacement measurement accuracy: better than ? 0.5%
κ、Stretching stroke: 0-1000mm (excluding accessories)
λ、Power supply: 220V, 50Hz
η、Displacement speed control range: 0.05mm/min~500mm/min, stepless speed regulation, speed can be set arbitrarily
Tensile test
One is to select the measuring range based on the sample, hang the thallium and align it with the engraved line, and adjust the buffer valve to match the measuring range. The second is to turn on the power, start the oil pump, and open the oil delivery valve to make the piston rise and fall 200mm, 2-3 times. The third step is to raise the piston by 20mm to 40mm and align the pointer with the zero position. Fourthly, adjust the moving crossbeam to the appropriate position. Close the oil delivery valve, press the "open" and "clamp" buttons on the clamp, clamp the sample, and be sure to keep the sample in a vertical position and in the middle. Adjust the indicator disk speed according to the loading speed required by the experiment. The fifth step is to open the oil delivery valve and start loading, so that the rotation speed of the pointer is basically consistent with the speed of the tracking disc. After the sample is damaged, close the oil delivery valve, record the test data, return the passive needle to zero position, and remove the fractured sample. Seven is to repeat the content from two to six and continue with the next experiment.
Functional features:
Adopting advanced foreign technology, fully digital amplification and acquisition, stable display, high accuracy, and convenient use. Adopting an aluminum alloy casing, the main unit is equipped with DC or AC servo motors, precision reducers, high-precision lead screws, which have the characteristics of smooth transmission, low noise, high speed accuracy, wide speed range, and long service life; Real time LCD display, capable of displaying test force, peak value, displacement, speed, test status, etc., with a generous appearance, easy to use, and simple operation; It has functions such as limit, overload automatic protection, and automatic shutdown for sample fracture. Install a set of standard stretching attachments.
Scope of application:
Widely used in tensile, compressive, bending, tearing, 90 ? peeling, 180 ? peeling, shear, adhesion, pull-out force, elongation at extension and other tests for metal and non-metal materials and component products such as wires and cables, textiles, waterproof materials, non-woven fabrics, seat belts, rubber, plastic, film, steel wire ropes, steel bars, metal wires, metal foils, metal sheets and metal rods, as well as special mechanical performance tests for some products.
(1)Common testing items: (common display values and calculated values)
● Tensile stress ● Tensile strength ● Tensile strength ● Tensile elongation at break
● Constant tensile stress ● Constant elongation at constant stress ● Constant stress value ● Tear strength
● Force value at any point ● Elongation rate at any point ● Pull out force ● Adhesive force and peak value calculation
● Pressure test ● Shear peeling force test ● Bending test ● Pull out force puncture force test
(2)Special testing items:
1. Elastic modulus, also known as Young's modulus of elasticity, is defined as the ratio of the normal stress component to the normal strain in the same phase. To determine the coefficient of material rigidity, the higher the value, the stronger the material.
2. Proportional limit: Within a certain range, the load can maintain a proportional relationship with elongation, and its maximum stress is the specific limit.
3. Elastic limit: The maximum stress that a material can withstand without permanent deformation.
4. Elastic deformation: After removing the load, the deformation of the material completely disappears.
5. Permanent deformation: After removing the load, the material still retains deformation.
6. Yield point: When a material is stretched, the deformation increases while the stress remains constant, and this point is called the yield point. The yield point is divided into upper and lower yield points, and generally the upper yield point is taken as the yield point. Yield: When the load exceeds the proportional limit and elongation is no longer proportional, the load will suddenly drop, and then fluctuate up and down over a period of time, causing significant changes in elongation. This phenomenon is called yield.
7. Yield strength: The quotient obtained by dividing the load at which the permanent elongation reaches a specified value during stretching by the original cross-sectional area of the parallel part.
8. Spring K value: the ratio of the force component in phase with the deformation to the deformation.
9. Effective elasticity and hysteresis loss: On a composite material tensile testing machine, when the specimen is stretched at a certain speed to a certain elongation or to a specified load, the percentage of the work recovered during shrinkage and the work consumed during stretching is measured, which is the effective elasticity; The percentage of the energy lost during the elongation and contraction of a sample compared to the work consumed during elongation is called hysteresis loss.
Configuration List:
Name Quantity Check
One host (single arm structure double column structure) is optional
One high-precision photoelectric encoder
One set of fully digital speed control system and fully digital speed control motor
A set of high-precision ball screw pairs
A set of precision arc synchronous deceleration system
One high-precision load sensor
A set of fixtures
Lenovo computer, one optional
One optional inkjet printer
产品售后服务承诺表述如下:
1.我方对于提供的产品免费保修三年。保修期满后,我方将继续跟踪服务,客户享受终生维修,负责及时提供必要的售后服务、技术咨询。
2.保修期内人为损坏的零部件按采购(加工)价格收费更换。
3.可为用户提供上门服务。
4.提供实时的远程诊断和维护服务。
5.保修期内提供免费的产品软件升级、故障排除、性能调优、技术咨询等售后技术支持服务情况
6.视频指导培训操作人员,使参训人员能正常操作仪器、初步会判断故障、简单维护保养。
7.每年进行客户回访。
8.软件升级:终生免费提供新版本控制软件。
9.提供适用、详细、全面的中文产品说明书和维修手册。
10.提供对故障2小时内响应,24小时内的现场服务。
11.技术支持:对于所需仪器的用户,根据用户的要求提供专业的技术方案。除了常规的仪器服务外,我公司技术部还可为用户提供各种非常规设备的技术支持。